Body Analysis Scan
Accurate and repeatable body composition and dimensions.

Accurate and repeatable body composition and dimensions.
Project Information
This is a long read due to the history and level of detail and cross-team problem-solving that I encountered during the product’s 6+ years of evolution.
Company
Advanced Health Intelligence
Body Analysis, colloquially known as BodyScan, was the original Intellectual Property (IP) technology of MyFiziq, later known as AHI. It initially utilized cloud computing to compute circumference measurements (chest, waist, hips, thighs) for a singular fitness vertical.
BodyScan was merely one of the numerous products that would eventually become part of the product suite.
At one point, the product lineup comprised of:
⁍ BodyScan: Body circumference & composition
⁍ FaceScan: Cardiovascular Health for CVD, heart attack, stroke
⁍ FingerScan: PPG analysis for Fitness Evaluation and Health at Rest in the BHA.
⁍ Biometric Health Assessment (BHA): Combined biometric health assessment
⁍ MotionScan: Range of motion assessment
⁍ HemaScan: "Blood Scan" – Blood sugar, cholesterol, lipids, metabolic health
⁍ DermaScan: Image-based skin condition identification
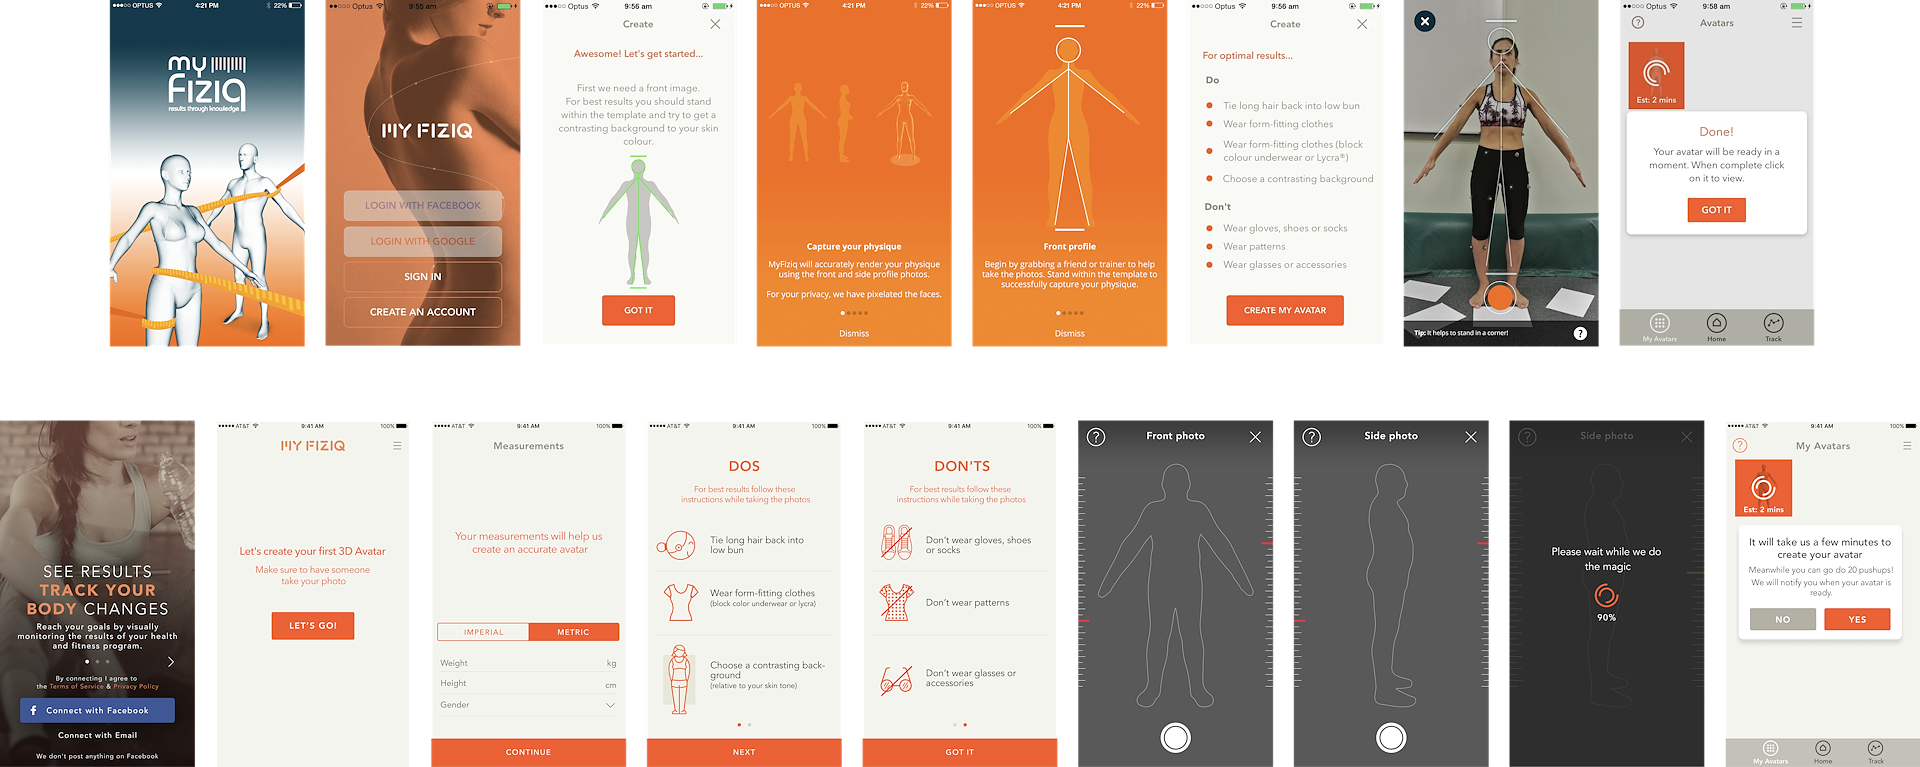
In its early stages, the body scan necessitated two individuals: one to operate the phone and execute the capture, and the other to be the subject, performing a front ‘A’ pose and a side ‘I’ pose.
One notable requirement for a successful body scan was for the individual to don form-fitting clothing, or even be nude. Given the requirement of two people involved in the process, this raised significant privacy issues, often preventing a scan from taking place. The potential partners deemed the two-person capture process as an unacceptable compromise, prompting the development of a one-person scan experience as a high priority.
The transition from version 1 to 2 of BodyScan presented unique obstacles and details, which I will delve into in the following sections.
Since I joined the organization, significant enhancements were made to BodyScan’s process and functionality, including shifting from cloud-based to on-device processing. Although I am unable to showcase all the original screens (due to their unavailability), it’s clear even now that I had a broader vision for this project that surpassed the minimal viable product (MVP) updates that were delegated to our team.
As the sole product designer, I had to navigate numerous challenges. These included a rapidly changing business model, transforming from a business-to-consumer (B2C) model to a two-tier business-to-business model (B2B*2B). Additionally, I had to do all marketing-related tasks, partner integrations, and cover the responsibilities of the primary product role. It was a busy time :-)
Moreover, the primitive version of our product was far from satisfactory. Notably, it was developed by two third-party companies based in Australia and Germany. The product, primarily a business-to-consumer (B2C) app, felt more like a proof-of-concept (POC) model developed by technologists, rather than a user-friendly platform designed for everyday human interaction.
Legacy two person experience focused on Fitness from 2015 and 2017.
Avert your eyes… (not designed by me)
Despite the noticeable visual limitations, a significant amount of research was yet to be completed. This process began with the development of a single-person scan experience and involved considerable enhancements to the app while transitioning from a B2C to a B2B model.
Single person experience.
The top and bottom rows represent major shifts in technology and experience (covered later on)
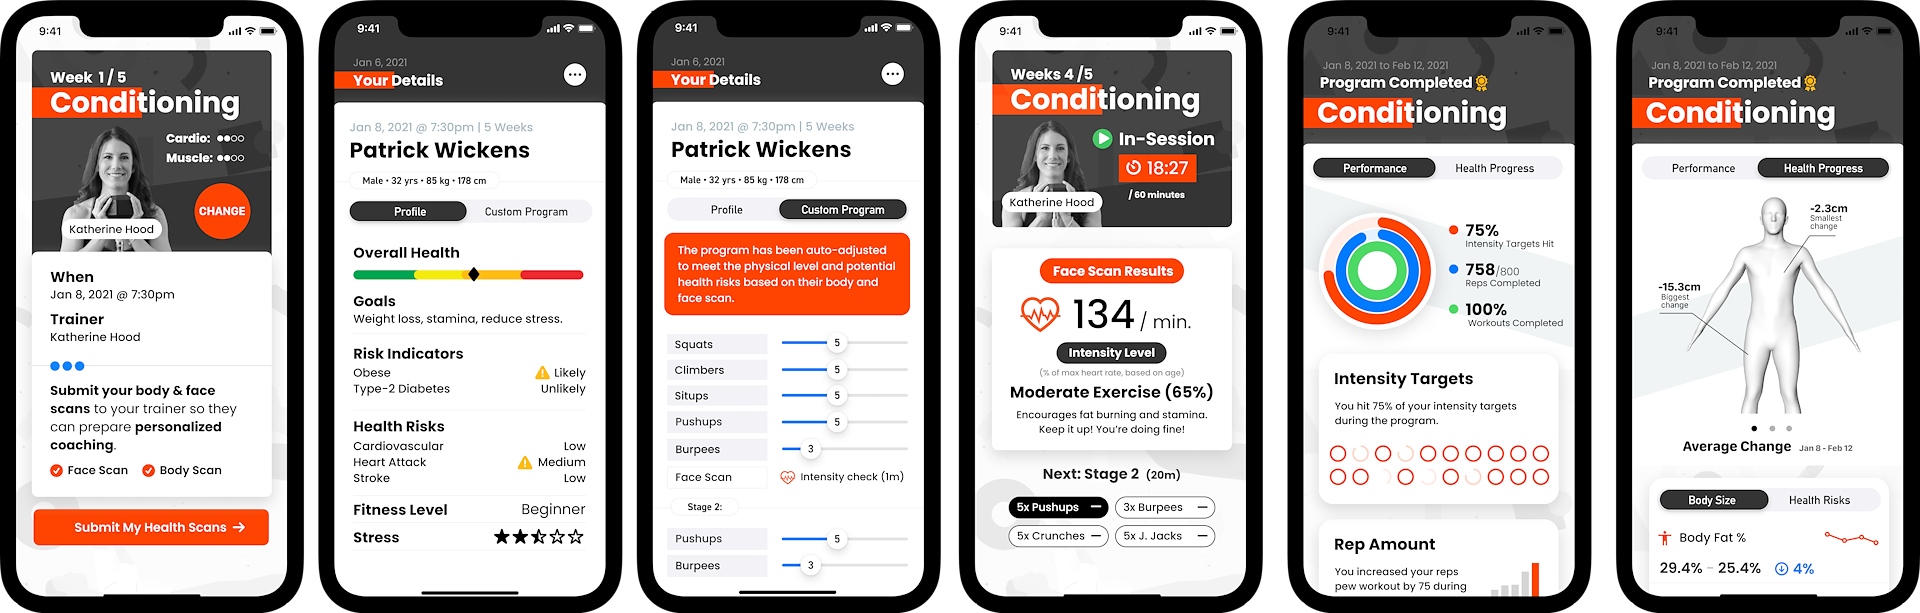
Market-oriented information about the current product is accessible on the AHI website. Its most significant impact is in the healthcare sector, which continues to be the company’s primary focus. However, there were multiple industries to support as the company aimed to claim prior art and pivot. The main industries I was tasked with supporting for several years included:
⁍ Health & Wellness
⁍ Life and Health Insurance
⁍ Fitness
⁍ Apparel
I developed use cases tailored to each market, which were utilized throughout the sales and customer support processes. I initially created partner-facing documentation (excluding developer-specific materials), which was subsequently supported by another designer and eventually by dedicated staff.
🧿 This project was a typical Figma handover that I shared with partners. Given that everything was driven by the Software Development Kit (SDK), much of our discussions revolved around navigation, entry and exit points, theme options, and so forth
BodyScan 1.x: AHI Technology demo app
At this point, BodyScan and FaceScan were the only products available technology, but I designed it so other scans can be added.
This Figma project and supporting documentation, including video, was shared with partners and respective product teams.
BodyScan 1.x: Fitness use-case with remote coaching.
All of these were completely fictitious and used to discuss integration ideas with partners, as well as in all pitch materials.
One competitor that entered the market was Amazon Halo. It was a hardware device (wearable) and an accompanying app that had several other features like sleep and activity. Years earlier, they had acquired another company, BodyLabs, and were using the phone to 'scan' people. Combined with some research, they trained a body measurement pipeline with some detailed visuals.
The Process
It used the front camera and also required you to stand in front of the device. But it required you to take 3 photos of yourself: Front → Side → Side.
The Halo introduced more poses to account for the larger give in phone height (knees to waist). Their UI degrades sharply from the UI side of the app into the scan and out again. You will notice her feet are cut off, but it still scans, despite requiring “Fill frame head to ankles”.
The balance they walked required more physical actions. It was a rushed product. The UI was poorly implemented, and there was far too much messaging around rearranging arms and legs.
It’s worth noting that they chose a partially transparent outline of a person that is filled to demonstrate how someone should stand. In our version, we use a custom hollowed-out version to stand inside. I do not doubt that this was to avoid patent infringement with AHI.
I reviewed their tech extensively but could not get my hands on one to review myself. It left me feeling pretty positive about what I had done and the length of effort in balancing the number of steps and acceptance with a decent result. To be up against a big player like Amazon and still come out on top, it’s a feel-good moment 😊
The method for the body capture process was patented in several countries, which prevented us from making any changes to the process that might invalidate the patent. The process is straightforward. It required a person to stand within a body outline and take photos from the front and side. While we had the flexibility to innovate within this process, we couldn't take a fresh or 'reimagined' approach to body measurement.
One issue that needed addressing was the time it took for image processing and measurement calculations. After the images were taken, it took about three minutes to compress, send, process, and return the measurements from the cloud.
As time progressed, modern devices were being equipped with faster CPUs and GPUs. Some of the image processing work, particularly a step referred to as 'Pose Inspection', could now be handled by the device itself before sending it to the cloud for further processing. I will provide more information on Pose Inspection in the following sections.
BodyScan 1.x from another perspective.
These were shots that I exported for customer success whereby partners could customise or replace the template from inside Canva.
A 3D model is generated from front and side silhouettes. This 3D model is then measured to provide circumference or composition values.
On-device Processing
Shifting from cloud-based image processing to on-device processing marked a significant transformation. It eliminated the waiting period and the process of information extraction from cards. Moreover, I was able to remove most network error states that required retry prompts and support screens.
Utilizing the burst mode feature on iOS and the video keyframe attribute on Android, I was able to collect a set of 8 images. These images could be calibrated to normalize pose-related data for examination. The application of flash animation and other transitions made the process seamless and smooth.
This marked a pivotal achievement—it provided a smooth, swift feedback mechanism for capturing a larger data set. In addition, the processing was private and secure, showing promising enhancements in both functionality and user experience.
Pose inspection
The pose inspection process involves verifying that a person is positioned within the front and side outlines. This check is performed on both the front and side images. If the inspection fails, the user will be prompted to take another picture. This step is crucial since all of our data collection models are trained on these specific poses. Therefore, the segmentation process must be completed successfully.
In the past, if you took multiple photos at once and wanted to check if they were good, you had to send them to an online service for inspection. If one or more of the photos were bad, you would have to retake them. Now, with the models running on your device, the inspection process happens immediately after you take the photos all at once, and you can move on to the next photo or exit.
Real-time joints
Initially, our cloud inspection utilized Computer Vision to identify the color average of key areas of the body, ensuring that the skin tone of the hands, head, and ankles are similar. However, this method faced challenges due to variables such as socks, eyewear, or naturally lighter palm colors, and variations and color in lighting.
As a solution, we evolved our approach and implemented a more refined joint model. This was based on anatomical markers located within the human skeleton, in the 3D model we were generating.
As technology advanced, access to real-time human joints through iOS and Android became possible. This development reduced complexity and ushered in new possibilities like trigger-based capture from human pose.
Several requirements for a scan were defined by the MLCV (Machine Learning, Computer Vision) team which came with their own challenges. Several other major issues were discovered through external and internal user feedback sessions as the technology was shared.
Problems snowballed, with some being a bigger problem than others. Each person is unique in that their physiological and environmental conditions will impact the success of the technology.
There is a lot of magic under the hood, but some problems cannot be solved with new models because the method of capture has an upper limit of accuracy and diminishing returns vs development cost.
The accuracy, sensitivity, and specificity are important when compared to gold standards. They can shadow the differences in how the technology will be used, as it is not a replacement for certified tech. When it comes to risk analysis, percentile accuracy becomes less important than the classification of health risk due to the magnitude of predictors, such as ethnicity, socio-economic factors, family history, diet, and activity.
For example, the circumference measurements returned by BodyScan are compared to an ISAK method for anthropometric measurements (two measurements within a 2% margin).
When solving design problems, the accuracy and repeatability of the technology could not be compromised.
Partner Primer Video
A very quick partner tutorial video I put together to alleviate some partner issues.
This was designed to temporarily help partners with the biggest issues but without making it obvious that there are a lot of things to consider.
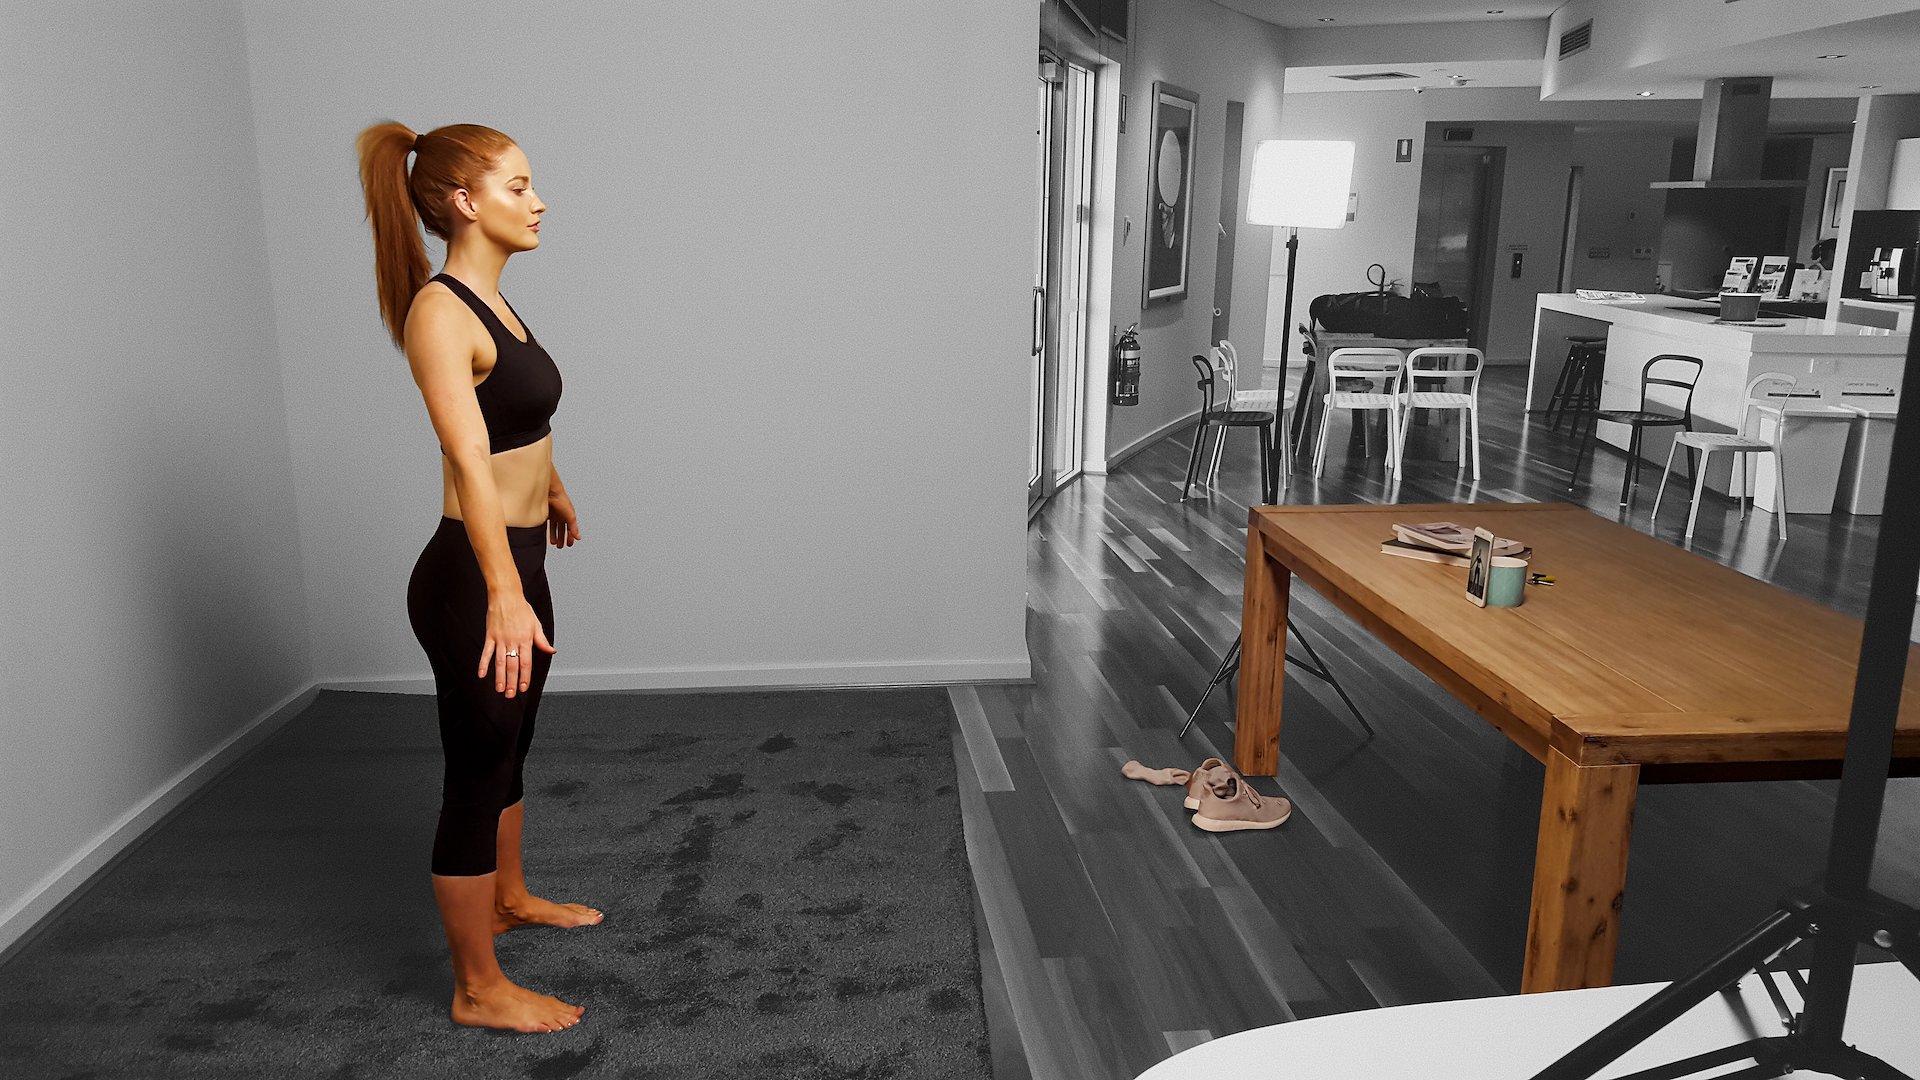
BodyScan: Typical phone setup
(from my first film shoot)
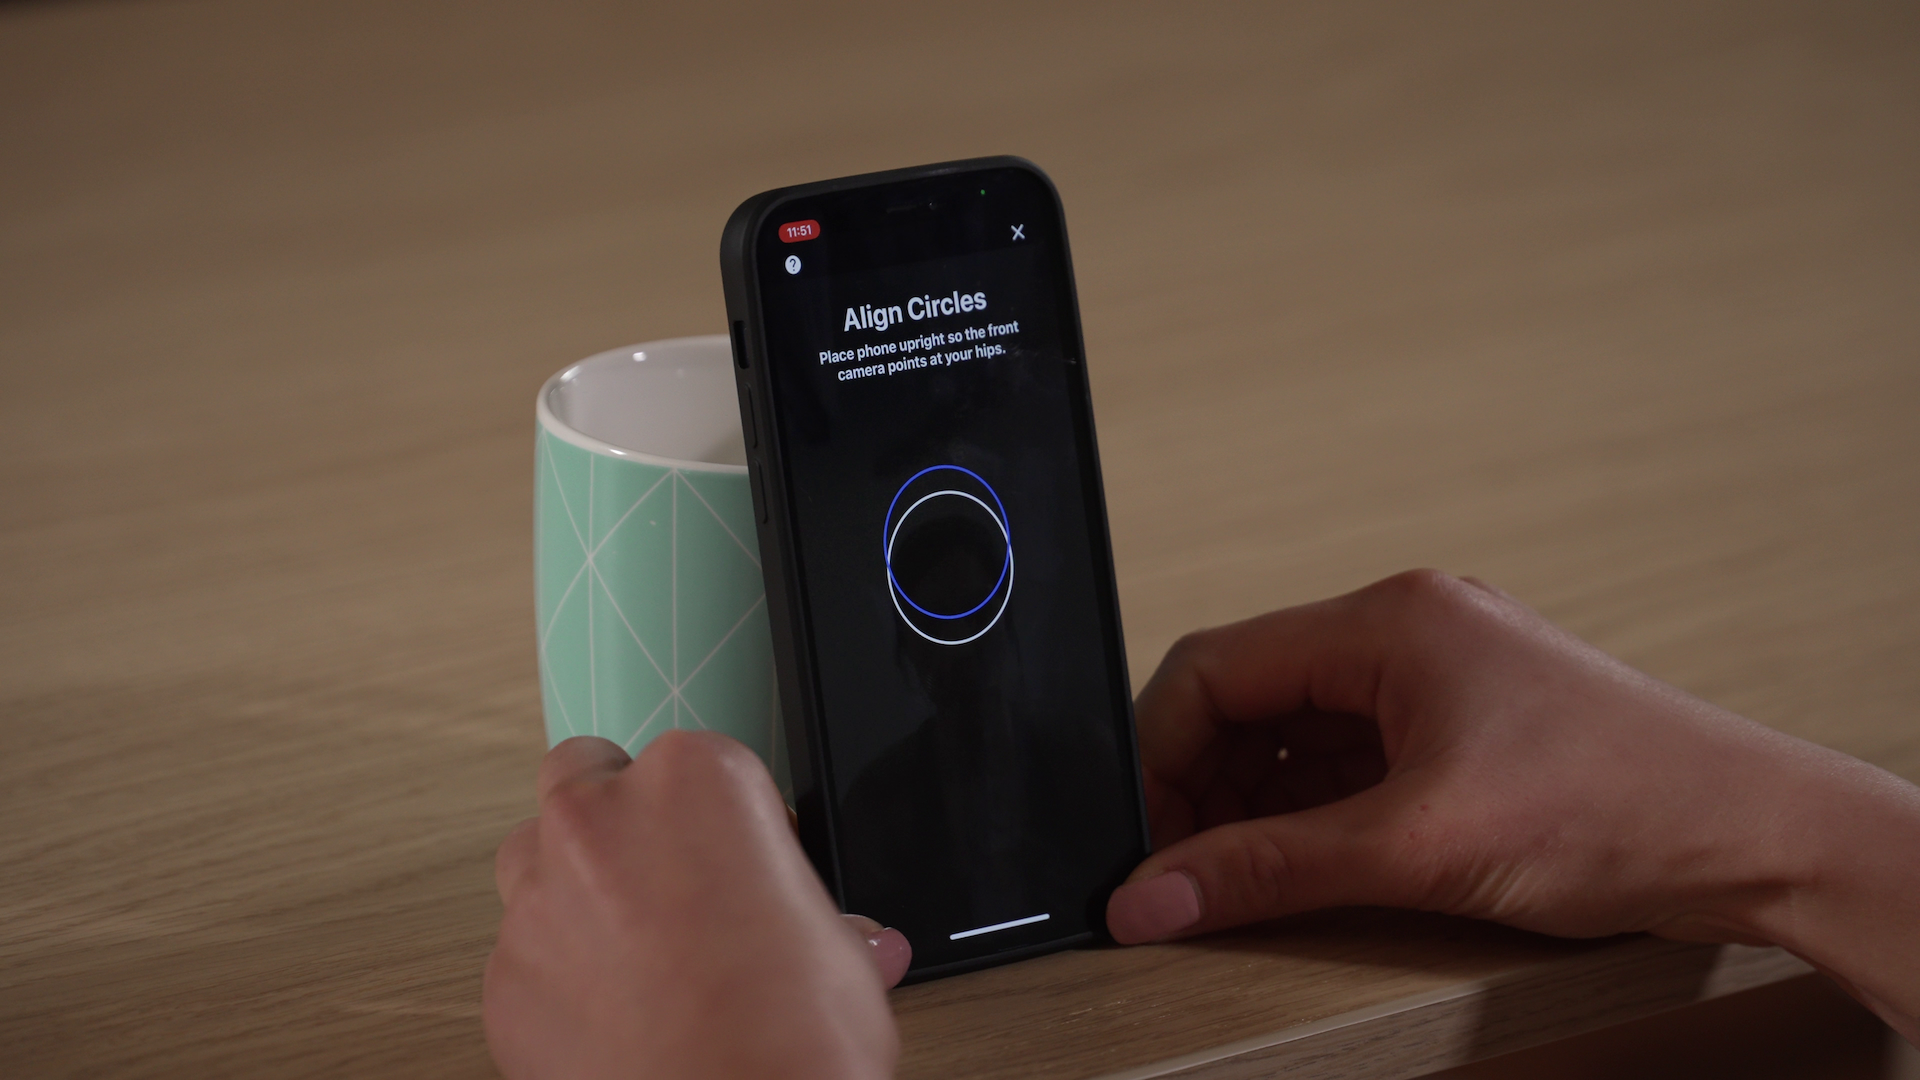
The phone must be positioned upright within ±10° to avoid body distortion. Fixing the device around the central region of the body ensures a distortion-free capture of the body extremities.
However, the angle of the device can be challenging in practice. Varying shapes, materials, and cases make it difficult to maintain a stable position. Slippery surfaces and different edge designs can cause the device to slide during the scan, requiring the user to start over.
Additionally, the object used to prop the phone must support its weight. With larger and heavier devices, there is a risk of misalignment as the phone may tumble or gradually slide.
Some users may instantly prepare for their front-facing picture, but even a slight shift can cause misalignment of the circles on the device. This may go unnoticed from a distance, leading to confusion and the need to realign the device up close.
The edges of some phones are flat (latest Apple). In this case, some people may prefer to balance it on the edge rather than use an object.
It is important to note that during user testing, phone alignment was identified as the second most challenging step. This difficulty is due to environmental surfaces rather than the user interface.
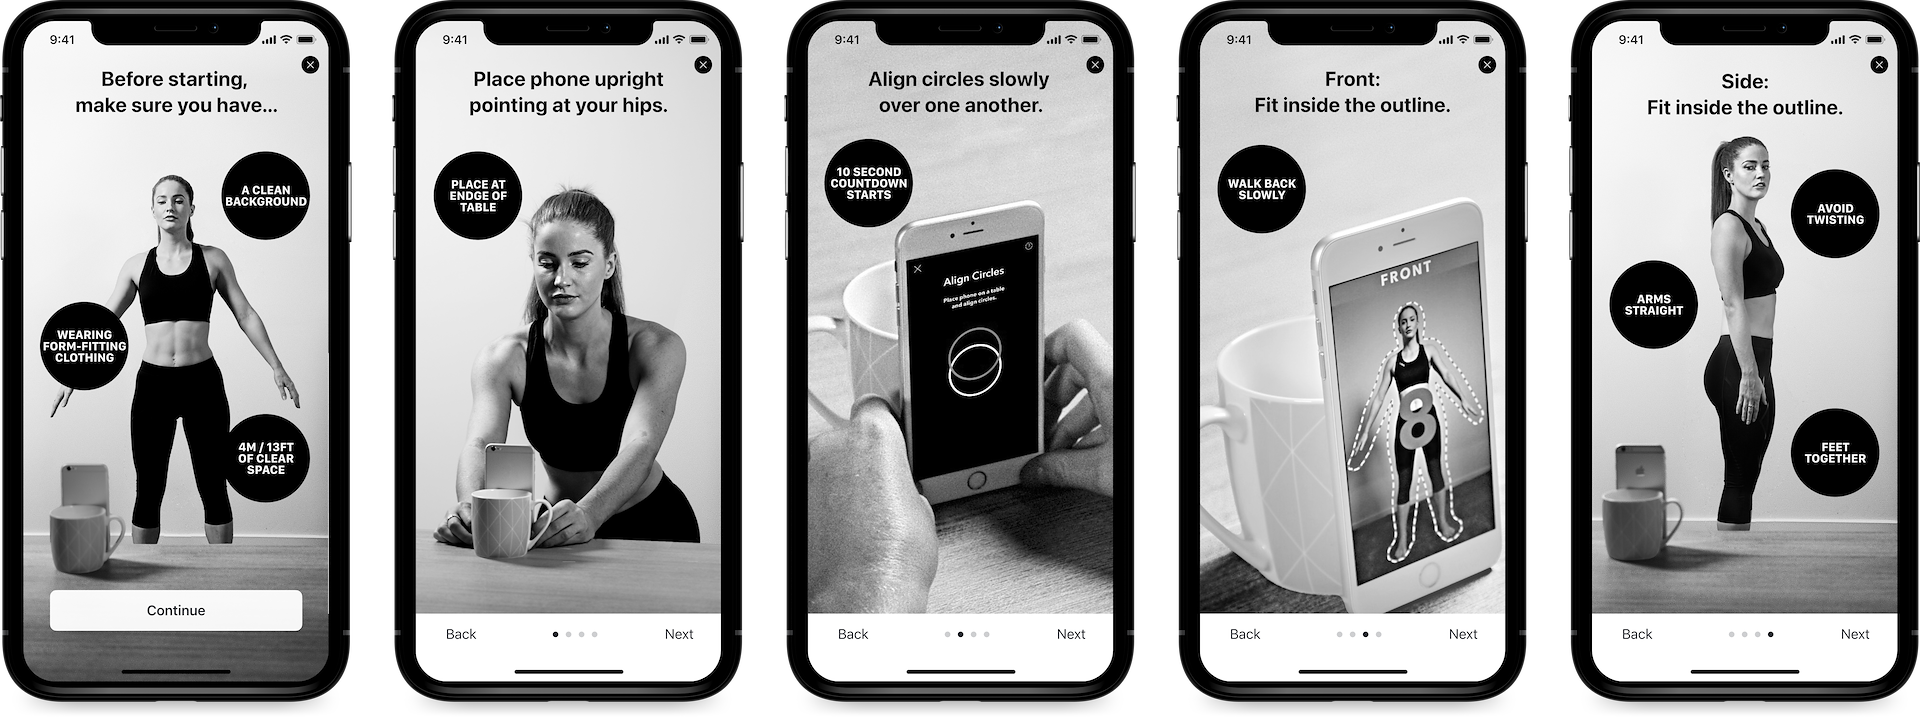
BodyScan 1.x Alignment
Also known as Phone Setup, posed a challenge for many individuals.
Until fully addressed, I made sure to show the thumbs edging the phone back slowly in our support and promo materials.
The scan guide was initially part of the integrated SDK, along with other features like results views and track & compare. However, during the process of rebuilding BodyScan, the decision was made to remove the scan guide and let partners handle the integration.
I opposed this decision because it added time and cost to a project, which delayed its launch and getting the data into the ecosystem. Some partners chose not to use our guide assets and created their own guides. This sometimes resulted in a less satisfactory user experience as they overlooked key points such as phone height, leading to higher scan failure and drop-off rates.
The impact of this decision was significant. In a value proposition analysis I conducted, I estimated a minimum expense of US$250,000 for integrating BodyScan, per platform. It was identified as a major barrier to the success of the product.
This also impacted the time it took to collect people’s biometric data, further delaying the point of data saturation in a partner’s ecosystem. Our technology was meant to be fully integrated into their decision-making processes and become indispensable.
Placing the phone too far back on a surface can result in the view of the ankles being blocked when positioned in the outline. This issue is exacerbated by the fact that someone viewing the small screen from a distance may fail to notice that their ankles are not visible as people will focus on their face and head.
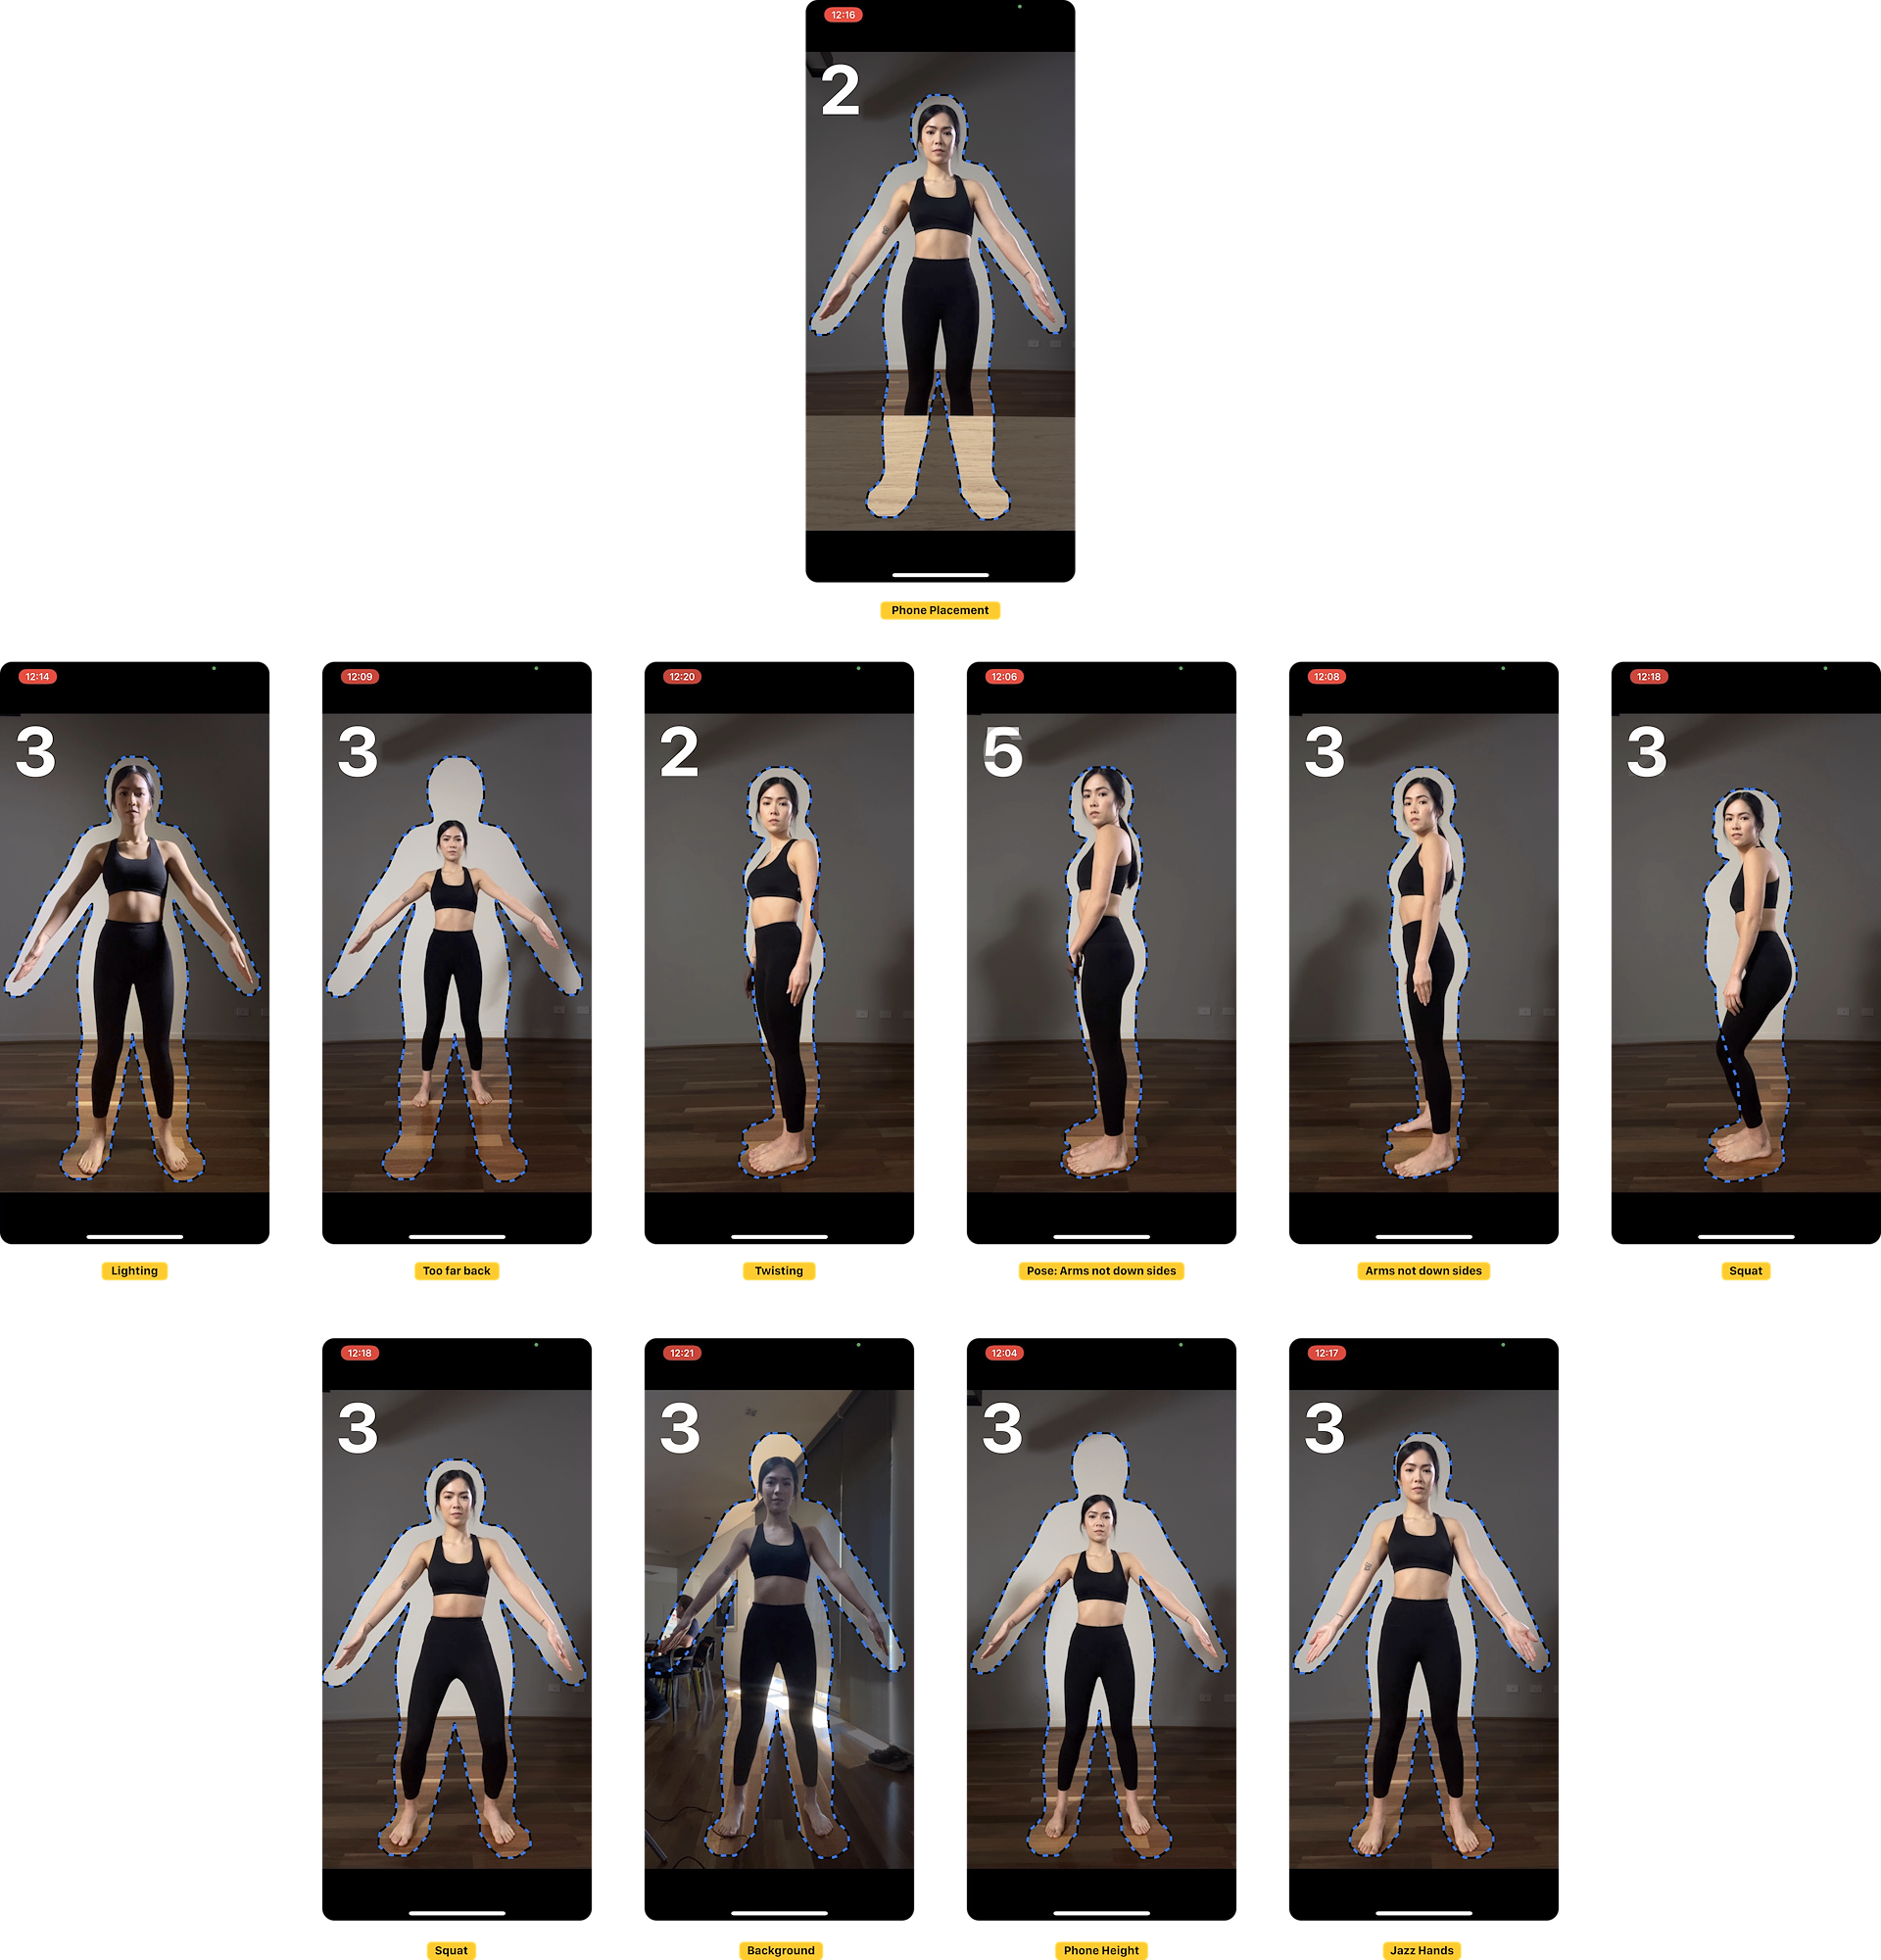
Various issues that occur during capture.
Categories: Lighting, pose and phone placement, and phone height.
Usually a combination of these would occur, potentially pushing it over a threshold and affecting accuracy.
Audio triggers were implemented for various steps during the capture process. For example, a ‘tick’ sound would play when aligning the circles, and a chime would sound during the 3-second countdown. In case of an error, a down-tone chime would be heard, accompanied by appropriate messaging.
However, a challenge arose as most people have their phones set to silent. Vibrating was not a viable option as it would not be audible and could cause the phone to misalign. Additionally, there was no messaging encouraging users to turn on their audio for a better experience.
In the timed photo scenario, the beeps would prompt people to stop moving and say “cheese.” A flash effect was used on the screen, although it was not visible from the front. Audio played an important role in creating a familiar photo experience.
In future releases, voice-generated instructions and an “Audio on/off” feature were planned. This would allow users to choose whether to have audio instructions in their native language, using built-in languages or professional voice recordings.
Internally, a challenge arose for developers and others who repeatedly used the technology. The constant beeps and clicks became disruptive in an office environment, leading to the permanent disabling of audio. This resulted in developers and QA forgetting to check and test the audio triggers.
Physical Space
A person’s height determines the space needed to fit into the outline. Taller individuals require more distance, while shorter individuals can stand closer. Living spaces vary worldwide, beyond our control.
Lighting
When a person is positioned against a wall, shadows can be cast, causing segmentation to include them as part of the body, like clothing.
Direct sunlight can create contrast issues and affect segmentation. Background light or reflections from mirrors can overexpose the image, potentially causing light bleed.
Body-Background Contrast
Insufficient contrast may occur when a pale person or someone wearing white stands in front of a white wall, or when a dark-skinned individual is against a dark background.
Complex Backgrounds
Complex backgrounds including picture frames, artwork on walls, chair legs, and pot plants can interfere with accurately identifying a person’s joints. This can trigger face detection issues.
Joint Detection
We relied on Apple and Android face detection and joint models, without object or scene detection to assess background complexity. We had to either use this technology or develop a solution alongside it, as we have done in the past.
To ensure accurate measurements, individuals should wear form-fitting clothing or be partially/fully nude. Bulky clothes add mass and interfere with measuring the human body.
Clothing with patterns or faces can cause issues with detecting joints and trigger face detection. Common examples include black tights or yoga pants. Insufficient contrast in exposed skin can also pose challenges during segmentation.
Some users expressed discomfort in looking at themselves on the phone. Body dysmorphia is not uncommon and leads to a negative experience when viewing themselves.
To address privacy concerns, I initiated a research project titled "Body Analysis: Privacy" that yielded surprising results and several additional benefits.
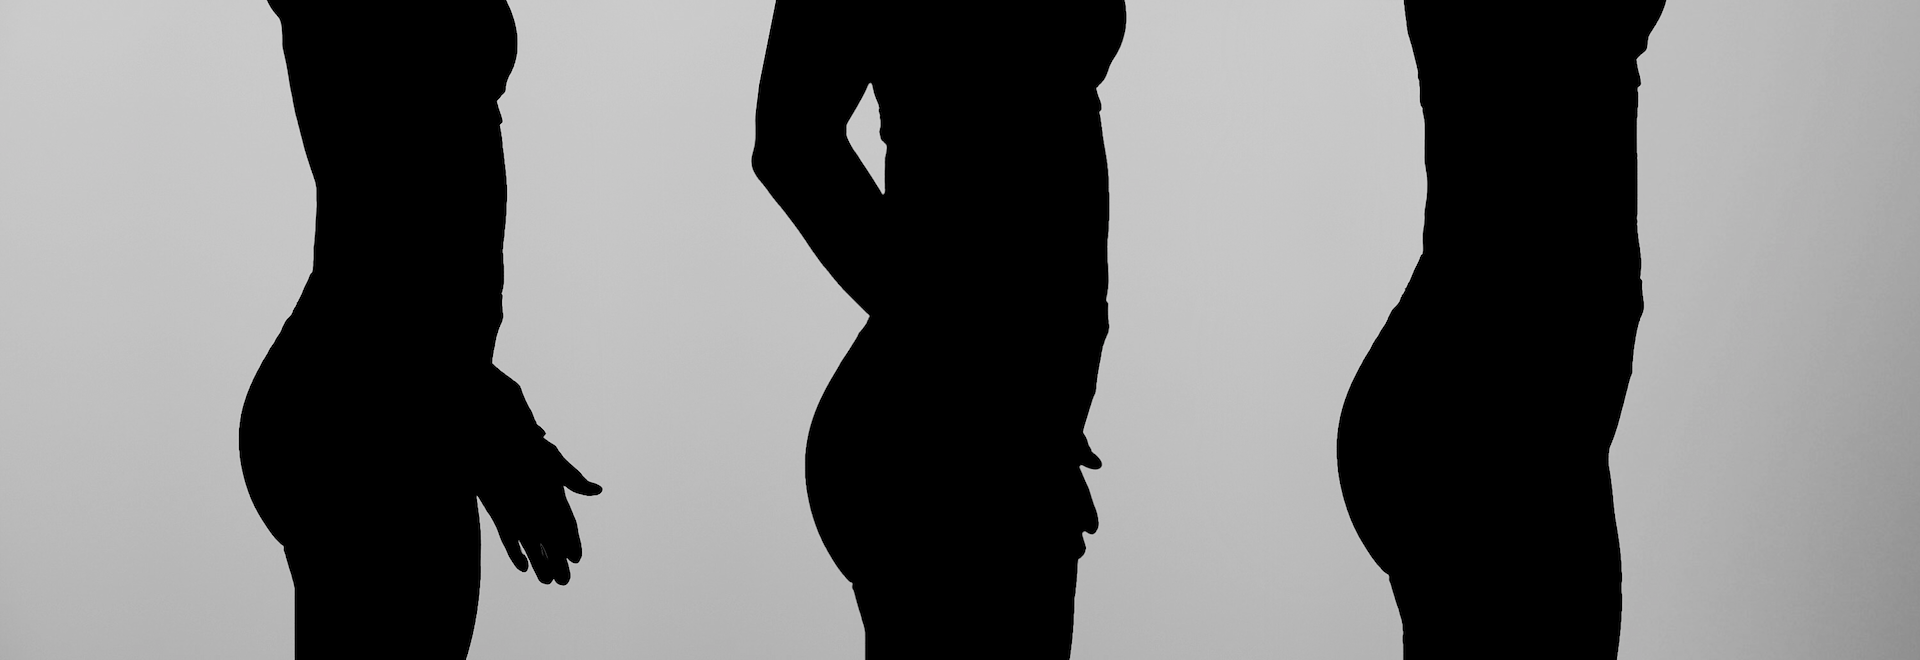
Bodyscan silhouettes and added extrusion.
Any twist, bulky clothing, belts, etc would add more mass to a person's body.
Methods for mitigating its effects can only work in natural circumstances built into the baseline data, such as 'allowable twist'.
Performing a body scan may seem straightforward, but like many complex UX problems, the devil is in the details. To ensure accurate scanning, a person needs to find a physical surface in their home that is slightly shorter than half their height. The camera should be positioned at around half their body height, and the physical device height needs to compensate for the difference. The size of phones, ranging from SE to Max, can make a significant impact on the scanning process.
To address this, I researched the height of common furniture available at places like Ikea. Furniture, designed for human use, is built on established standards. In some cases, there is natural flexibility built into most furniture, such as adjusting leg height.
The challenge arises when individuals are either above or below average height. Combined with the device angle, it can become impossible for them to fit within the scanning outline. To mitigate this issue, we implemented height-based suggestions. For those within a shorter range, we recommended using a dining room chair or a coffee table with books. For those above average height, a kitchen table or dining table with books was suggested.
Due to the height and device angle, some individuals attempted to take a body scan multiple times but failed. Occasionally, the height was correct, but they were in a confined space such as a bathroom, so they could not fit in the outline.
The height of the phone proved to be the most significant factor and barrier in performing a scan. As a result, the BodyScan underwent a major overhaul, resulting in version 2.0.
Phone capture (live version)
Phone capture (demo version)
The phone height problems reported by users was the initial trigger for updating BodyScan. It had reached a point where advancements in phone technology made it possible to rethink the capture using real-time capture.
New algorithms and ML models were created and extensively tested through some baseline captures of people and a custom-built device rig. This would move a phone up a guide and perform captures of a test subject. Eventually, by ‘walking the curve’ and collecting more data we could give another ±10cm around a person’s midpoint. A person would have a greater choice of surfaces to capture their measurements.
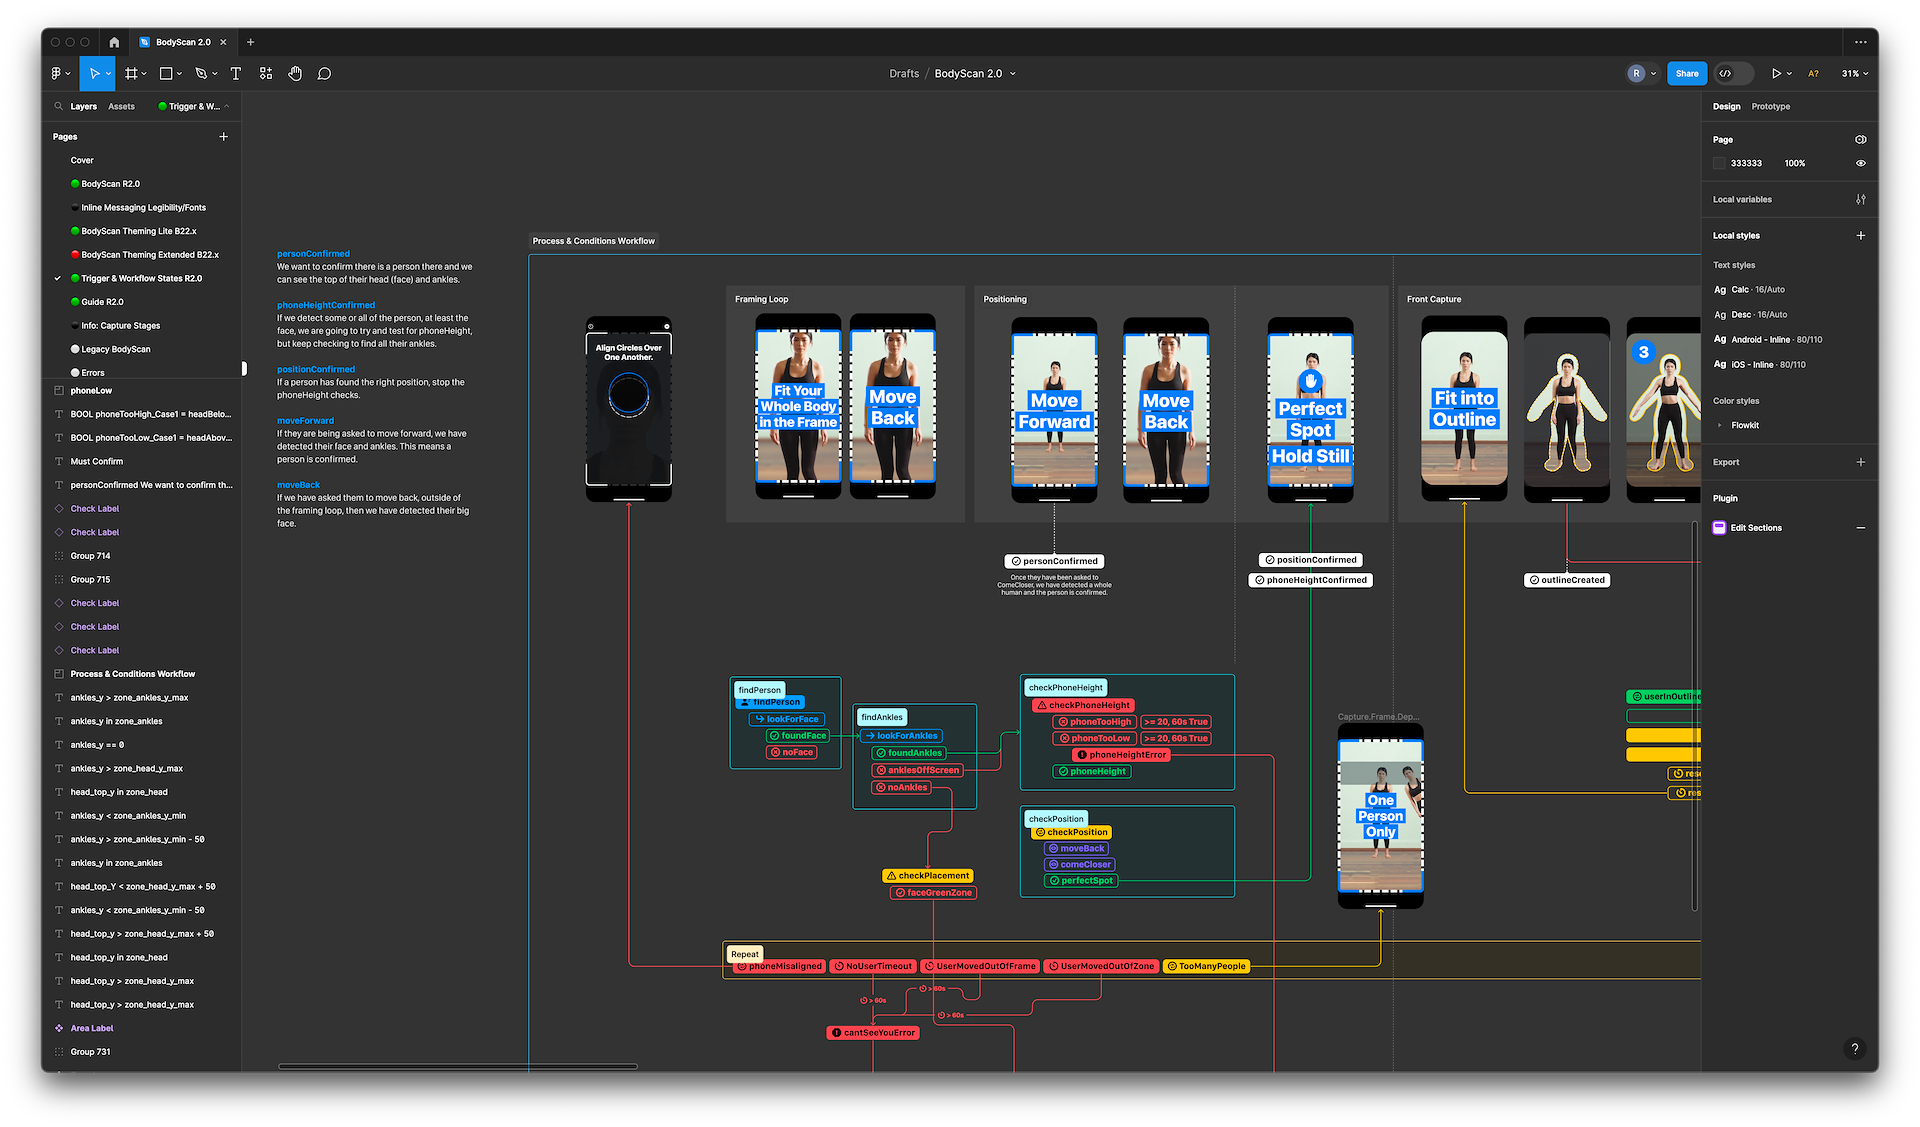
I broke the new capture into stages depending on the physical stages a person performs or a major trigger. These are:
❶ Alignment (Phone Setup)
❷ Framing Loop
❸ Positioning
❹ Front Capture Loop
❺ Side Guide
❻ Side Capture Loop
BodyScan 2.x Debug Mode
Each stage of the workflow is associated with specific conditions, events, and checks that are crucial for coordination between the primary developer and QA. I created a comprehensive workflow diagram in Figma, which served as the primary reference throughout the project. This improved onboarding time for new developers.
BodyScan R2.0 Process Workflow
Understanding the nature of the checks is crucial. These checks involve an integer count and a timeout, rather than a simple true or false evaluation. While adjustments to the count may be made during the UX testing process, it is important to establish a default based on intuition and practical experience.
For example, when running checkPhoneHeight, we are keeping track of the counts for phoneTooLow and phoneTooHigh. If either count exceeds 30, it triggers a critical error (displayed in red) indicating that the phone is either too low or too high for a successful capture, prompting the user to adjust it accordingly and restart the scan.
The reason these are counts is due to how the camera angle and a person leaning forward or backward as they move. The count starts when the person is in an upright position, with the head joint aligned within the green or grey areas.
The timing of when the count begins adds another layer of complexity. It is essential to start the count only when the phone is properly aligned and a human presence is detected through face detection. As the checks progress, new ones can be initiated. Messages are displayed based on the person’s movements and pose.
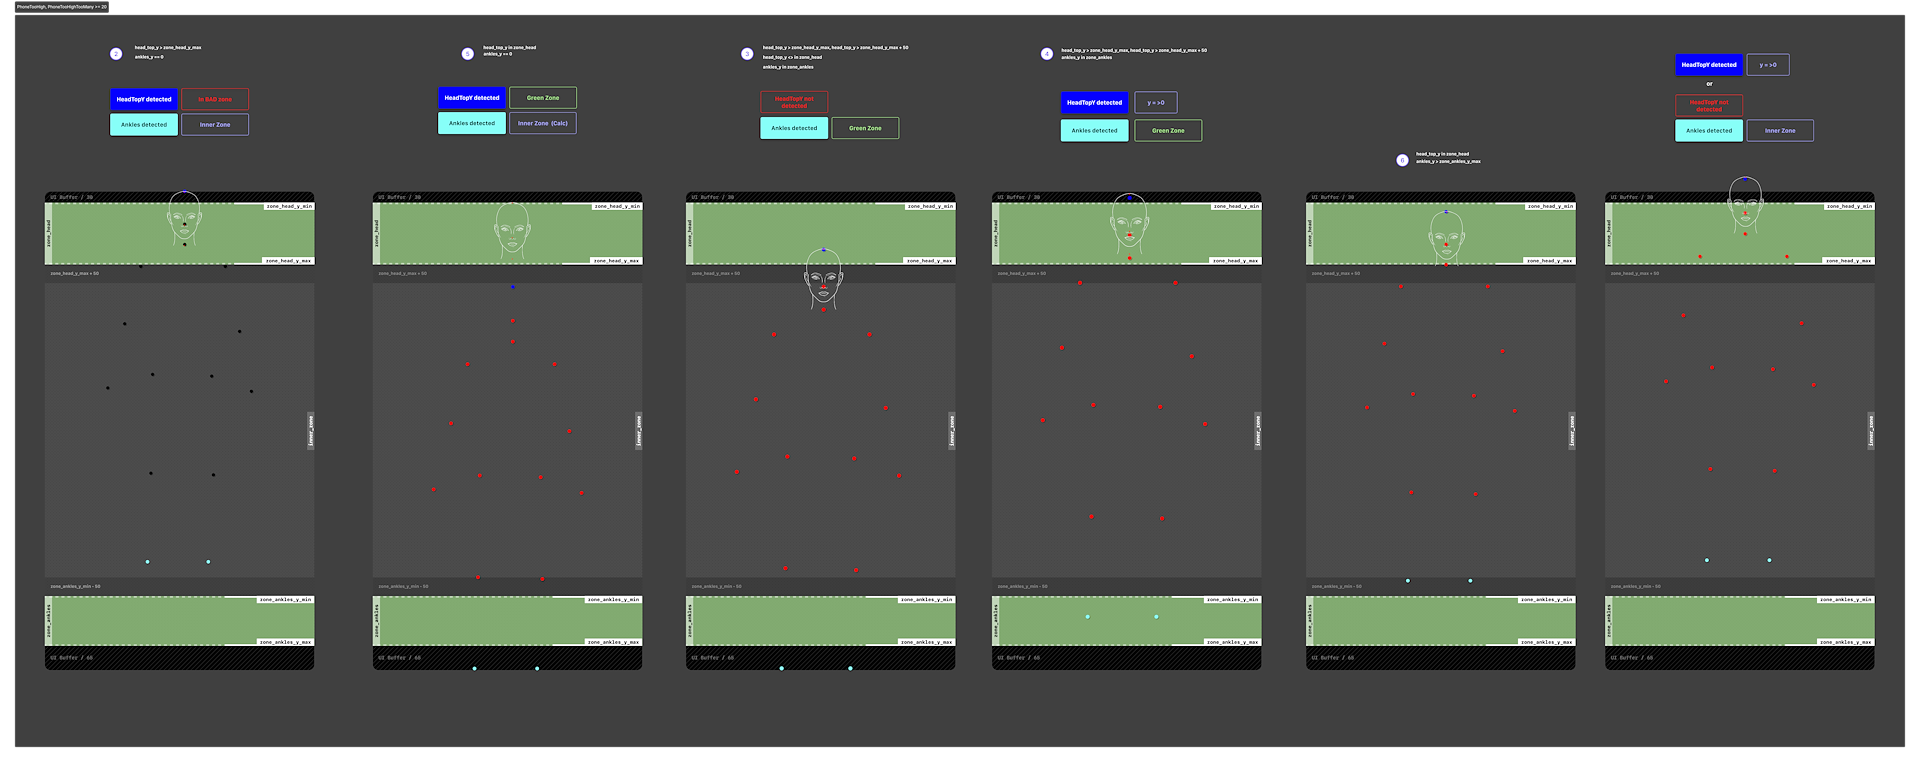
Visual Guide to Triggers
Visual guides for each of the conditional checks played a crucial role, both for developers and to ensure that QA could replicate errors. I worked with a 16:9 portrait camera viewport, which had a superimposed outline generated from a 3D model based on a person’s height, weight, and gender. This approach resembled matte painting visual effects in cinema, allowing me to display relevant information on the screen in relation to the person’s movements.
Some of the conditionals for phoneTooHigh:
BOOL phoneTooHigh_Case1 = headBelowZoneBuffer && anklesBelowHeadZone;
BOOL phoneTooHigh_Case2 = headBelowZone && !hasAnkle;
BOOL phoneTooHigh_Case3 = headBelowZone && headBelowZoneBuffer && !headInZone && feetInZone;
BOOL phoneTooHigh_Case4 = headBelowZone && headBelowZoneBuffer && feetInZone;
BOOL phoneTooHigh_Case5 = headInZone && !hasAnkle;
BOOL phoneTooHigh_Case6 = headInZone && anklesBelowZone;
The most challenging and error-prone stages occur before the outline is drawn. We need to determine if there is a person present, if we can see their ankles, and check the height of the phone—ensuring it’s neither too low nor too high. This involves a series of movements, such as moving forward or backward.
Assuming everything goes smoothly and the person doesn’t wander off to make a coffee, we achieve successful positioning of depth for them to stand. Even if they move out of position, we have already identified the correct spot for them to stand. The outline is then matched to their approximate body shape, making it easy for them to fit in by simply repeating their previous actions.
BodyScan 1.x involved a 10-second countdown followed by a burst mode of 8 images. However, in this version, we were able to significantly reduce the wait times by using real-time joints and inspection. Once the person was successfully in position, the outline would change from dashed to solid. At that point, a countdown would start from a familiar 3 seconds.
The purpose of the 3, 2, 1 countdown experience is solely to ensure that the person remains still and focused during the scanning process. However, we can start capturing images as soon as they are in the correct position, even if it’s just for a brief moment, without any indication or countdown. Once we have obtained the necessary data, we can seamlessly move on to the next pose.
While this alternate method could be explored in another project, it would introduce certain challenges that may extend the project timelines.
BodyScan 1.x guide
The initial guide consists of 5 screens that need to be shown before starting the scan. These screens are designed to be viewed while the user holds the phone in their hands.
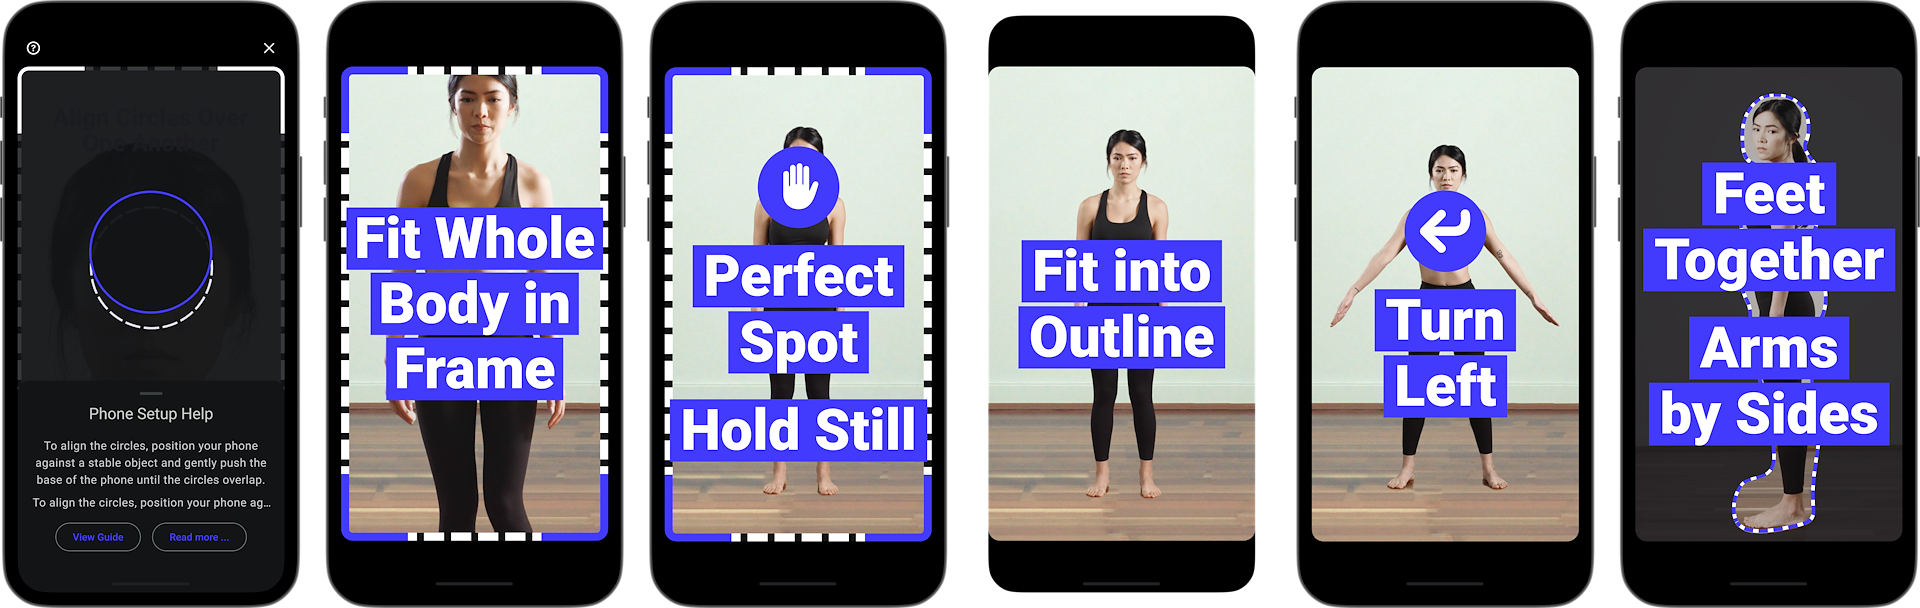
BodyScan 2.x inline messaging
As the technology was improved, inline messaging was used for instructions during the scan.
BodyScan 1.x underwent unsupervised user testing to establish the baseline for comparison. The main test goal is to record the Time To Completion (TTC) and the number of attempts. It's also important to mention that, for multiple reasons, the project has been (and probably still is) under development for over two years.
A major part of this development centered around the UX testing and development loop. The initial Proof of Concept (POC) was conducted using well-timed video prototypes that utilized the built-in camera in ProtoPie. This progressed into some doctored guides and some rudimentary inline messaging to test certain flows.
Test conditions include:
⇢ The scan must be conducted in the participant's own home.
⇢ Participants must meet the age and device criteria.
⇢ Must screen record all attempts, including start and end times.
⇢ Complete a post-capture feedback form.
The screen capture would be manually reviewed, and the observations entered into spreadsheets and then later into Dovetail. Although the criteria focused on specific items like TTC and the # attempts, the screen recordings provided an invaluable glimpse into people's homes.
You can observe pose hesitation and body augmentation, lighting, background objects, time of day, available prop objects, clothing, fridge magnets, distractions from children and light sources, etc.
Data points from the video and feedback included:
⇢ Time to successful scan
⇢ Time to correct position from bad position
⇢ Total attempts
⇢ Front: Total phone position changes
⇢ Message trigger: Phone position changes
⇢ Message trigger: Move forwards
⇢ Message trigger: Place phone higher
⇢ Message trigger: Place phone lower
⇢ Time spent with no countdown or message
⇢ Good body positioning score
⇢ Side photo: Phone position changes
⇢ Time spent with no countdown or message
⇢ Side photo: Faced forwards
⇢ Side photo: Good body positioning
⇢ Environment score
Post-capture feedback questions:
💬 Overall, the task of taking a BodyScan to get results was (1-10)?
💬 Why did you give it that rating?
💬 What was the easiest part of the BodyScan for you?
💬 What was the hardest part of the BodyScan for you?
💬 What object/type of surface did you place your device on?
💬 What kind of objects did you use to prop your phone up to align it?
💬 How did you measure your weight before taking the scan?
💬 How did you measure your height before taking the scan?
💬 Did you actively read the scan instructions before starting the scan?
💬 Was there anything that just felt odd?
💬 What would you change in the scan process to make it easier for you?
Below are some UX screen recordings to outline the various problems and observations that could be observed.
I had to remain focused on key metrics and not attempt to fix every problem but having the screen recordings meant that I could revisit them at any time to collect different information.
The UX Test Summary Report is unable to be shared. ☹️
Video: BodyScan 1.x
Starting with the baseline body scan you can observe that the phone setup (alignment with circles) is a problem. Despite not comparing this metric between the new body scan, it made it clear that future updates needed to address this problem.
BodyScan 2.dev1
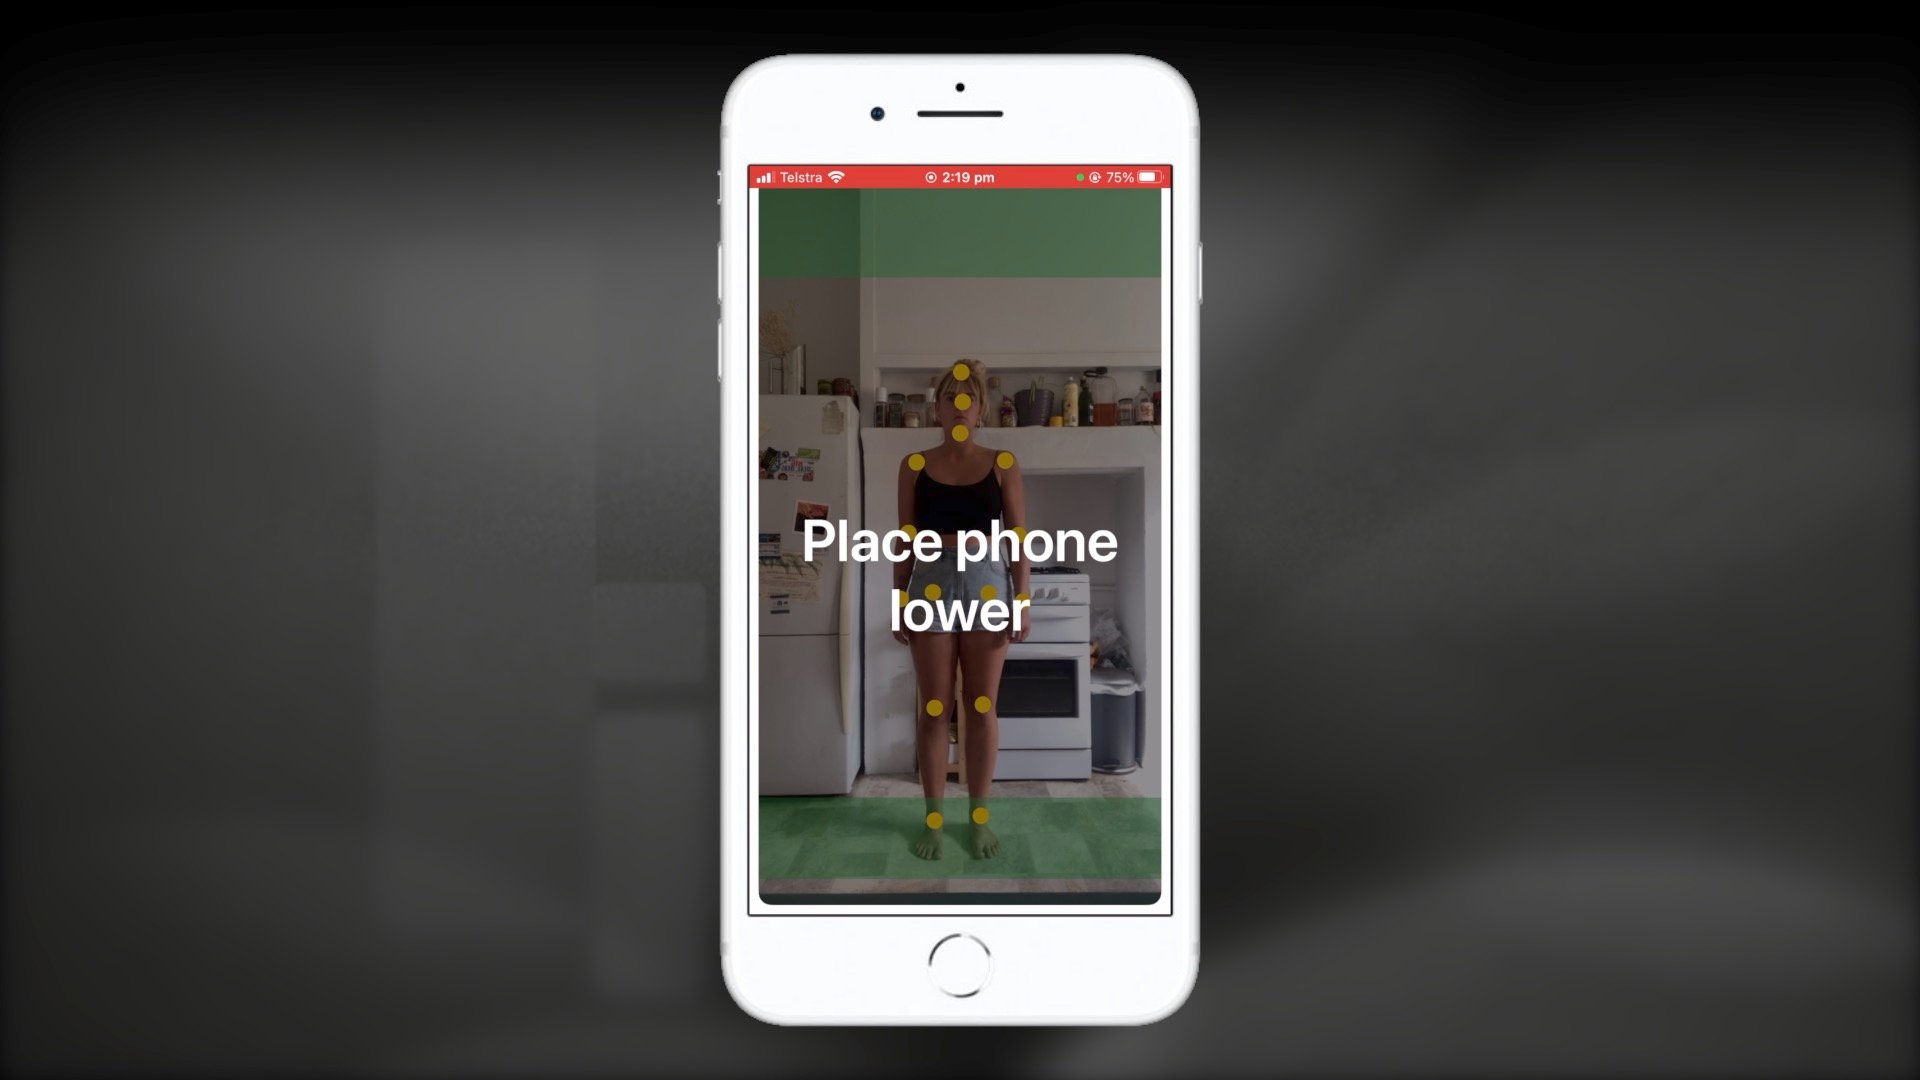
The first development build included an updated guide to inform testers of the expected functionality. While the UI appears similar in parts, the initial validation checks and triggers for phone height, face detection, head position, and ankle visibility were all active in the background.
The tester encountered an immediate phone height error. She moved out of frame to grab an object and adjust the phone height, demonstrating that the messaging works to identify improper positioning. Without this error message, testers would struggle (or impossible) to fit within the outline.
The in-app instructions directed the user to position the phone at hip level. Although she did navigate through the guide screens, the hip-level placement emphasis did not sufficiently register. In a follow-up interview, the tester confirmed reading the instructions but admitted the details did not commit to memory. Realizing her oversight, she estimated a new phone height. The supporting book she used is slightly visible (~1cm) at the bottom of the screen after the adjustment.
She then adjusts the height again for the final attempt. The messaging worked as anticipated, and she found the correct position to stand in and completed the scan successfully.
However, some messages and counts are incorrect or missing. When the app has trouble detecting joints and a timeout occurs, it displays the message "Something’s not right," and the user must start over. She leans forward, reads the message, taps 'Try Again,' the phone re-aligns itself, and she begins anew—this time completing the front and side poses successfully.
Video: BodyScan 2.dev2
This build introduced different triggers and timing, and in some instances, it did not represent an improvement over the first. I included it to illustrate the critical role of observation and to highlight an understanding of the processes occurring behind the scenes. Additionally, the joints were made visible. Activating this feature allowed for a clearer visualization of the mechanics at play. These development tools have been further enhanced, as can be seen in the “BodyScan 2.x Debug Mode” video above.
You’ll notice numerous device interruptions. It seems she had recently completed her phone’s setup, which resulted in post-installation messages appearing while she was aligning the device.
It was immediately apparent to me that the phone was positioned too high. She conducted the scan near the kitchen, utilizing a small, rounded dining table, which intermittently obstructed the view. Standing at 165 cm tall, and factoring in the angle of the phone, she was precisely at the limit of the phone height calculations.
The kitchen provided a cluttered and complex backdrop, potentially complicating segmentation or joint detection efforts. The primary light source appears to be a window, likely situated above the kitchen sink to her right. The home is of an older style with high ceilings and features a space where a wood-fired oven once stood, now occupied by an electric stove.
The first instruction to “place phone higher” was triggered erroneously. This indicates an issue with the height calculations and the algorithmic count. At the 1:50 mark, when the message appeared, her head joint was within the ‘safe’ zone, and her knee joints were also correctly positioned. The system should have instead prompted her to ‘Place phone lower’.
1:50 (still image)
The device slips several times, indicating that the object used to prop it up is not sufficiently heavy, or that the phone’s case, in conjunction with the surface it rests on, is too slippery.
After another attempt, a message to lower the phone appears at around the 4:51 mark. The mix of frustration and amusement is evident on her face, betraying her thoughts: “First it’s too high, now it’s too low?!” The messages flash on the screen, and she strains to read them from a distance.
4:51 (still image)
After multiple unsuccessful attempts, she eventually abandons her initial setup in search of a different surface in another room. By now, the setup process has become familiar, and she spends considerably more time “salsa dancing”—my term for the user’s forward and backward movements as they attempt to find the correct depth for the scan.
Ultimately, she manages to complete the capture. During the follow-up interview, she expressed significant frustration with the height adjustment instructions. When I inquired about the time she thought the setup had taken, she estimated ‘15 or 20 minutes.’ In reality, the entire process lasted approximately 5 minutes. However, her perception of time was distorted by the combination of frustration and the physical inconvenience of having to change locations, which made the experience feel much longer.
While working on R2.0, I implemented additional messages and support for both dark and light modes, elements that are apparent in an ongoing but simplified Figma project. The plan was to transition to illustrated and customizable guides—potentially animated—for enhanced clarity and readability of messages.
This work was intended for inclusion in the BHA Project, aimed at Body Analysis assessments. Consequently, screens from this development phase were temporarily repurposed as placeholders while the project moved forward.